Getting Started with Custom Screens
Getting familiar with Custom Screens
Characteristics of a Custom Screen
Custom Screens are comprised of web applications that are built by a developer, and are then framed into the core native Tapcart mobile for a merchant's customers to interact with. The Web Bridge SDK helps broker any interactions so that a the web application can read/write data from/to the mobile app.
Hosting
Custom Screens are essentially embedded web pages, that are created and hosted by the developer. Your screen can be hosted anywhere of your choosing. Tapcart will need a URL with unrestricted access to the contents of the page in order for it to be bundled as a Custom Screen.
SDK Version
Custom Screens are powered by an underlying SDK, that allows it to utilize receive/write mobile app data. The SDK is imported automatically for every screen on the hosted web page.
As the developer of the hosted asset provided for a screen, you are responsible to maintaining the used SDK version. Keep an eye out for emails on new releases, as well as on this documentation.
Conditional Behaviors
If you are sharing hosted code between a screen and your website, then you'll want to implement conditional behavior anywhere an Action is used. This allows you to share code, and maintain a smaller total code base.
For example, if a user is on your website, and the user presses "Add to Cart" you're going to want to add that to cart using a web flow. However, if a a user presses "Add to Cart", and is in the app, then you'll want to add the product to the native app's cart (using an App Action).
const hybridAddToCart = (params) => {
   if(window.Tapcart.isInitialized){
      window.Tapcart.actions.addToCart({...params})
   }else {
      ...default functionality
   }
}
Authentification
Is Auth Needed?
Before you get started, ask yourself if users should be authenticated to view this screen. If so, you can conviently set this page to require users to be authenticated. This is done when deploying a page in the Tapcart dashboard, and does not require code changes. When users are required to be authenticated, they will see a login page when they view this page in the app. Upon logging in, they will then be shown the page.
If users do not need to be authenticated to view the screen, then consider how (or even if) the experience should change whether the user is known or not. You can leverage customer variables to determine if the user is know, and who they are.
Authenticate Users into the Screen
The Getting Started with Web Bridge SDK section lays out how to consider implementing auth on your web view.
Designing a Custom Screen
Remove Headers, Nav Bars & Footers
Custom Screens are embedded within the mobile app, and receive their own headers, navigation bars & frames that provide a native user experience to a user. Because of this, you should avoid displaying your own web nav bars, header bars, or footers on your Custom Screen. By ignoring this, users would obviously know that they are viewing an embedded website, which may negatively impact the perception of their app experience.
Defaults
The Web Bridge SDK will automatically hide <header> and <footer> html elements as well as elements with the id of header or footer. In addition the SDK will remove the Tapcart Mobile Download Banner if it is installed on the page.
Hiding elements with CSS
The Web Bridge SDK will add a class of tapcart-webbridge to the page when it is running inside of your mobile app. You can use this to easily hide elements by adding a style tag to your page:
<style>
  .tapcart-webbridge .your-class, .tapcart-webbridge #your-id {
    display: none;
  }
</style>
For more advanced cases you can add Javascript that will run on the page when it is displayed in your mobile app:
<script type="text/javascript">
  if(window.Tapcart.isInitialized){
        ...Tapcart behavior
    } else {
        ...Default functionality
  	}
</script>
What to do if you need to support a back button
If a user has navigated into a customs screen, then provide them with controls to move backwards without establishing a new navigation bar entirely. An example would include showing a nonintrusive back key without presenting it within a navigation back.
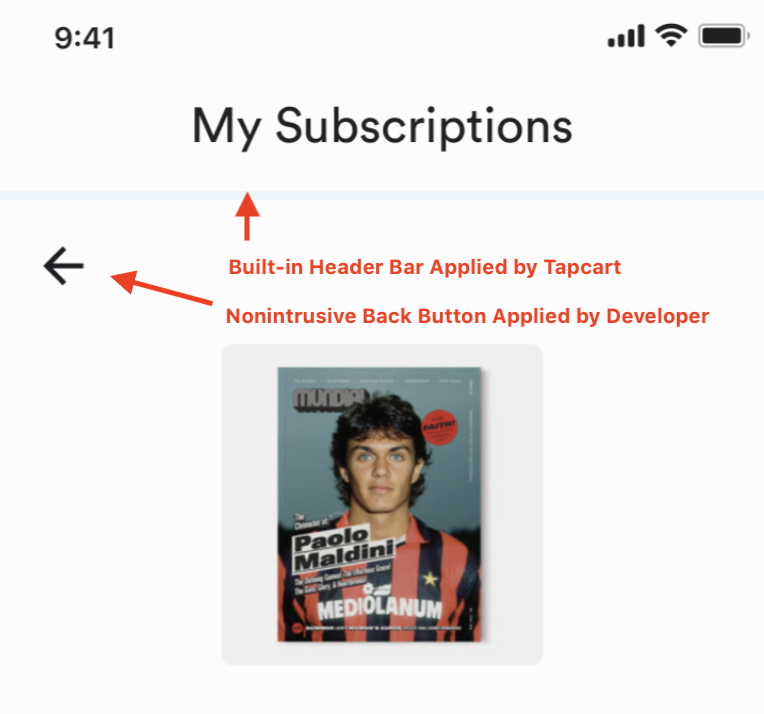
Example of a nonintrusive back key used within a Custom Screen
Using a cohesive design system
Ensure your Custom Screen's look & feel is cohesive with the rest of the app & any relevant brand guidelines. Leverage custom CSS, fonts, images, and interaction patterns to achieve this.
CSS reset
If copying CSS from another source, you may need to implement a CSS reset to achieve the expected results. Click here for a guide on CSS reset.
Applying custom fonts
Aim to use the same fonts that are leveraged in the app. Merchants can upload custom fonts with Tapcart, so there should be no limitations regarding matching the fonts used.
Looking to match the default fonts of a Tapcart app? The default fonts used are below:
- Roboto (Android)
- San Francisco (iOS)
Mobile responsiveness
Custom screens should be built as fully responsive websites. Any content such as text, images, buttons,
and layouts should be legible & easy to use regardless of a screen's size. Expect a horizontal edge-to-edge display, and consider how the height of a Custom Screen may look on various screen sizes. Avoid setting a fixed height or width on <body> or <html> tags, and let them get determined by screen height or width.
Using loading states
Custom Screens are shown to users as soon as they enter the view. This will be a snappy experience with minimal load time for a basic screen. However, you may need to implement a loading state if your screen is dependent on retrieving data from an API prior to showing itself to the end user.
Implementing success & error states
If a user interacts with your screen, you may want to let them know if that interaction was a success or a failure. You can quickly implement a native success/error state using the showToast app action. If you're planning on implementing your own success/error states, you should do so without the use of pop-up's or modals within your screen.
Using native device privileges
Custom Screens can access the following device privileges:
Permission acceptance & rejection
Certain privileges require explicit permission from the user (Such as location access & camera access). Your screen may need to support a scenario in which a user opts to withhold access to given privilege, and will need to display proper error messaging as a result.
- Automatically copy text to the clipboard: https://developer.mozilla.org/en-US/docs/Web/API/Navigator/clipboard
- Ask for location access: https://developer.mozilla.org/en-US/docs/Web/API/Geolocation_API
- Upload photos from the camera roll (iOS only currently):
<input type="file" multiple="multiple" /> - Upload files from a files app (iOS only currently)
Custom Screen cannot access the following device privileges:
- Open messages & draft a text message
- Open a native share sheet menu
- Open an email app & draft an email
- Open a calendar app & create an event
Updated almost 2 years ago